
Why Your RV Hot Water Smells Like Rotten Eggs
How to Flush Your RV Water Heater
If you turned on your RV faucets and noticed a rotten egg smell, your water heater may need to be drained and flushed.
This can happen when water sits in the water heater for too long. Maybe you came home from a camping trip and planned to go out again the next weekend, but life happened. A few weeks later, that water has been sitting in the tank, and now your hot water smells awful.
In many cases, flushing the RV water heater can help clear out old water and sediment so you can get back to fresh, clean-smelling hot water.
Quick note:This guide is for tanked RV water heaters. If your RV has a tankless water heater, this exact process does not apply. If you have a tankless water heater and notice a rotten egg smell, the issue may be coming from your water source, fresh water tank, plumbing lines, water filter, or another part of the RV water system. The next step may be sanitizing the fresh water system, replacing filters, or descaling the tankless water heater, depending on your setup.
And if you’d rather see the process visually, we’ve included the full video walkthrough at the bottom of this page.
First, Is the Smell Coming From Hot Water Only?
Before you start taking anything apart, check whether the sulfur smell is coming from the hot water side, the cold water side, or both.
If the smell is mostly coming from the hot water, your water heater is a good place to start.
If the smell is coming from both hot and cold water, the issue may be in your fresh water tank, water lines, filter, or water source. In that case, you may need to sanitize the RV’s full fresh water system, not just flush the water heater.
(We’re working on a repair guide for sanitizing your fresh water tank, and when it is complete we will link to it here. But until then, if you would like help sanitizing your fresh water tank, call RVFix at 844-667-8349 and we will walk you through the process over an RVFix Video Call with a certified RV Technician!)
What You May Need
To flush your RV water heater, you may need:
A socket wrench
A garden hose
A replacement drain plug or anode rod, if needed
Thread sealant or plumber’s tape, if recommended for your water heater
Gloves and eye protection
The socket size can vary depending on your water heater. A common metal drain plug/anode rod may use a 1 1/16-inch socket. Some plastic drain plugs may use a 15/16-inch or 7/8-inch socket.
If you are not sure what you have, check your water heater model information before forcing the wrong socket onto the plug.
Before you start: Turn Everything Off
Before draining your RV water heater, make sure the system is turned off.
That includes:
• The electric water heater switch
• The propane/LP water heater switch
• The water pump
• City water, if connected
Then give the water time to cool down.
Important: Do not remove the water heater drain plug while the tank is hot or under pressure. Hot water can spray out and cause burns.
Step 1: Relieve the Water Pressure
Before pulling the drain plug, you need to relieve pressure from the water heater.
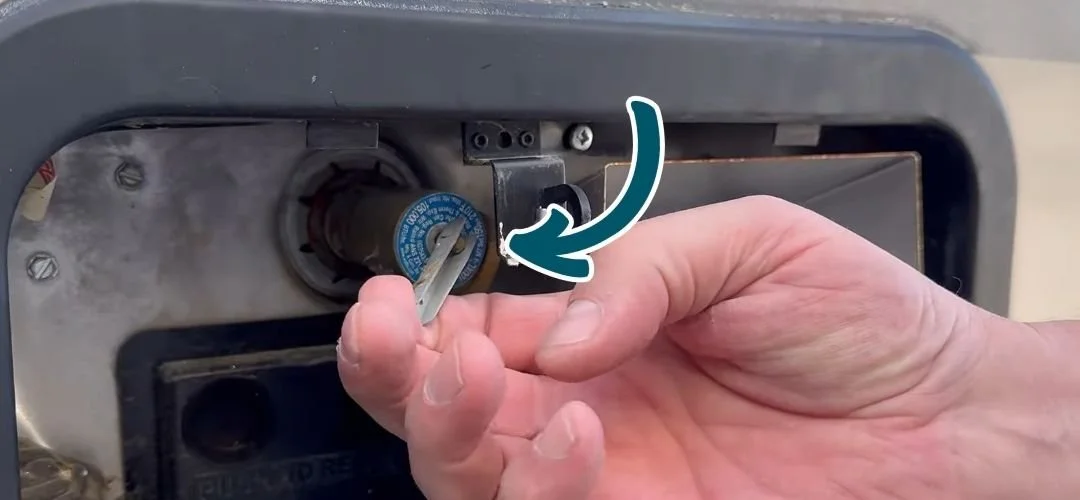
On the outside of the RV, open the water heater access panel. You should see the temperature and pressure relief valve, often called the T&P valve.
Lift the small lever on the T&P valve to relieve pressure from the tank.
You can also open a hot water faucet inside the RV to help relieve pressure before removing the plug.
Once the pressure is relieved, you can move on to draining the tank.
Step 2: Remove the Drain Plug or Anode Rod
Use the correct socket to carefully remove the water heater drain plug. (What socket size is my drain plug?)
Be ready to get a little wet. Once the plug comes out, water will drain from the tank.
On some RV water heaters, the drain plug is attached to a long metal rod. This is called an anode rod.
The anode rod is a sacrificial part designed to help protect certain steel water heater tanks from corrosion. Instead of rusting away the tank, the corrosion attacks the anode rod first.
Not every RV water heater uses an anode rod. Some water heaters use a plastic drain plug instead. Do not install an anode rod unless your water heater is designed for one.
Step 3: Check the Anode Rod
If your water heater has an anode rod, inspect it after you remove it.
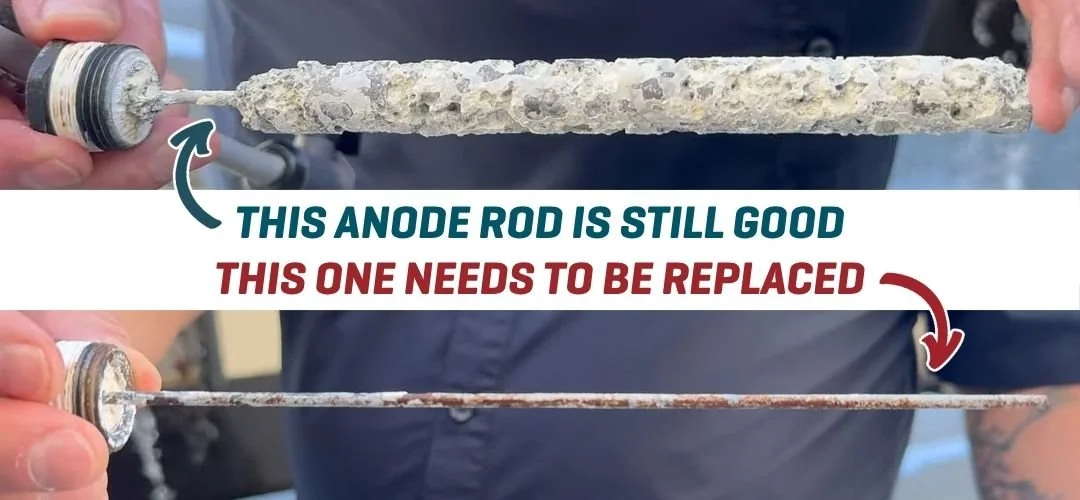
A used anode rod may look rough, pitted, or eaten away. That does not always mean it is bad. If there is still plenty of material left on the rod, it is still doing its job.
But if the rod is mostly gone, heavily deteriorated, or the core wire is exposed, it is time to replace it.
Step 4: Flush the Water Heater Tank
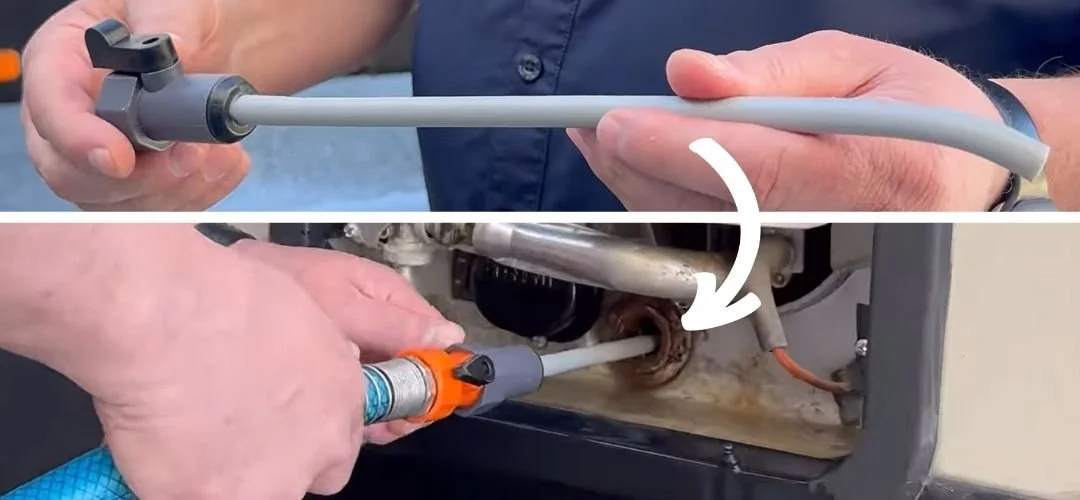
Once the tank is drained, you’re going to flush it out using a water heater flushing wand attached to a garden hose.
Insert the wand into the drain opening and turn the water on.
Move the wand around inside the tank to help rinse out sediment. You may see small white chunks or debris coming out of the drain opening. That is normal.
The reason this step matters is that the drain opening is not always at the very bottom of the tank. Sediment can collect below the drain opening and sit there, which may contribute to bad smells and poor water quality.
Keep flushing until the water coming out looks clear.
Once the water runs clear, reinstall the drain plug or anode rod.
Make sure it is threaded in correctly. Do not cross-thread it, and do not overtighten it.
If you have a Suburban-style water heater with an anode rod, Suburban recommends using a pipe thread sealant approved for potable water, such as Teflon tape, on the anode rod threads before reinstalling.
If you have a plastic drain plug, follow the guidance for your specific water heater. Thread sealant isn’t required on all of them.
If you are not sure which water heater you have, check the model tag on the water heater or call RVFix. We can help identify the correct plug, anode rod, and reinstall method before you put it back together.

Step 5: Refill the Water Heater Before Turning It Back On
This step is important.
Do not turn the water heater back on until the tank is full of water.
To refill the tank:
Turn the water pump back on or reconnect city water.
Open a hot water faucet inside the RV.
Let the air push out of the line.
Wait until you get a steady stream of water from the hot side.
Once water is flowing steadily from the hot water faucet, the water heater tank should be full.
Then you can turn the water heater back on.
Important: Turning on an electric water heater with an empty tank can damage the heating element.
What If the Rotten Egg Smell Comes Back?
If the smell improves after flushing, great. You may just need to make draining and flushing the water heater part of your regular RV maintenance.
But if the rotten egg smell comes back, there may be another issue.
Possible causes include:
Bacteria in the water system
A reaction between the water source and the anode rod
A contaminated freshwater tank
A water filter that needs to be replaced
If the smell is only on the hot side, the water heater is still the most likely place to focus.
If the smell is on both hot and cold, you may need to sanitize the fresh water tank and plumbing system.
When to Call a Professional
You will probably be able to flush your RV water heater yourself if you are comfortable with basic tools and RV maintenance.
You should get help from a professional if:
You are not sure how to safely relieve pressure
The drain plug or anode rod is stuck
The plug threads are damaged
The anode rod breaks during removal
The water heater continues to smell after flushing
You are not sure whether your water heater should have an anode rod
You are uncomfortable working around electrical components or pressurized hot water
Water heater maintenance is usually simple, but hot water, pressure, propane, and electrical components can create real safety concerns if something goes wrong.

Need Help Fixing Your RV Water Heater?
If you do not want to troubleshoot this alone, RVFix can help.
Give us a call at 844-667-8349.
We can connect you with a certified RV technician over a video call to help diagnose the issue, walk you through the next steps, and figure out whether you need parts, warranty support, mobile service, or a service center visit.
That way, you are not stuck guessing, buying the wrong parts, or losing camping time over a water heater problem.
Watch the Full Video
Prefer to see the steps visually?
Check out our full RV water heater flushing video below.
